| Overview | Table of Contents | Feedback |
Note: From Release 15.0 the Maintain Components (CRSW2030) page is incorporated into this page (CRSW2020). There is no longer a separate Online Help page for CRSW2030.
This page is used to create (or modify) a Component that is used in a Course Plan Structure Version (CPSV) (CRSW2005) or in another Component (i.e. a 'Composite' Component).
A Component generally defines a group of units that have commonality, and that form part (i.e. component) of a course of study as outlined in an institution's 'Handbook'. A Component is created by adding units to the Component, or by adding Components to a parent Component (in the case of Composite Components).
The following types (Categories) of Components can be created:
A Component is added to the CPSV on the Course Plan Structure Versions (CRSW2005) page. A Component can be created that will be unique to a specific CPSV or common to multiple CPSVs.
This page is accessible from the main menu, and from the following pages and forms:
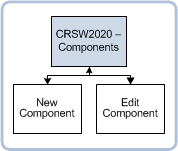
Navigation from the Components (List) page to the New Component page and Component (Edit) page is shown below:
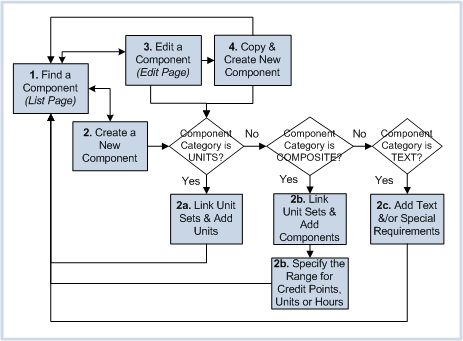
The following flow diagram is an example of the steps that may be followed to modify or create a Component:
The CRSW2020 page is one of a number of pages that are used to set up Course Plan Structures for use in the public-facing Course Plan Structures Enquiry system.
See the Course Plan Structures Overview Help page for more information and a diagram showing the relationship between the pages used to set up Course Plan Structures.
The Components page lists all Open and Closed Components. For a description of each column, see Field Descriptions, below.
To create a new Component, see the New Component Page section, below.
To edit a Component, or copy an existing one, see the Edit Component Page section, below.
See the Working with Lists overview Help page for information about finding and sorting records in the list.
There are two different methods that can be used to create a new Component:
1. Via the New icon located on the Components page. For instructions, see 'To Create a New Component', below.
Or:
2. (If the Component you want to create is similar to an existing Component) Via the Copy Component or Copy Component with Data icons on the Component (Edit) page.
For instructions, see 'To Copy and Create a Component', below.
The following table describes each field on the New Component page, including applicable Table values. An asterisk (*) indicates that the field is mandatory.
Note: Field labels are institution-configurable.
| Field: | Description: | |
| Component Name | Unique name for the Component. Unnamed Components cannot be re-used in more than one CPSV. Table Value: COURSE_PLAN_COMPONENT.COMPONENT_NAME |
|
| Published Name | Alternative name for the Component (optional). This name will be displayed on the public-facing Course Plan Enquiry system (not the Component Name entered above). Leave this field blank to display the Published Name (displayed in the Course Plan Enquiry system) to be the Component Name. Table Value: COURSE_PLAN_COMPONENT.PUBLISHED_NAME |
|
| *Component Type | Institution-defined Component Type defined in CRSW1030, for example, CORE, COMPOSITE, ELECTIVE, or MAJOR. Table Value: COURSE_PLAN_COMPONENT.COMPONENT_TYPE |
|
| *Component Category | Institution-defined Component Categoy defined in CRSW1020 and mapped to a System Component Category: UNITS, TEXT or COMPOSITE.
Table Value: COURSE_PLAN_COMPONENT.COMPONENT_CAT |
|
| Description | Description of the Component. Table Value: COURSE_PLAN_COMPONENT.DESCRIPTION |
|
| Closed | Indicates if the Component is closed or open. Select the check box to close the Component. Closed Components cannot be added to a CPSV or Composite Component. If a Component is closed after being added to a CPSV or another Component, it will continue to exist as a member of that group. This field is disabled for unnamed Components. To see if a Component is closed or not, view the Component in Edit mode. Table Value: COURSE_PLAN_COMPONENT.CLOSED_IND |
|
| *Qualifier | Institution-defined COMPONENT Qualifier defined and mapped to a System Qualifier in the Course Plan Qualifiers (CRSW1050) page. Important: STRUCTURE Qualifiers (from CRSW1050) are not included here, as they are only used when adding Components to a Course Plan Structure Version (see CRSW2040) to specify the hierarchical order of the Components. This Qualifier is used in association with the 'Qualifier Value' (see below) to record the terms in which the requirements for the Component are measured. For example, if the Qualifier is 'EQUAL-CP - Must complete this value of credit points' and Qualifier Value =5, then exactly 5 credit points are required to satisfy the requirements for this Component. The Qualifier specified here also determines whether or not the Qualifier Value and Upper Value fields (see below) will be displayed. For example: - If the Qualifier is mapped to a System Qualifier of BALANCE, BALANCE-CP or BALANCE-HOURS, the Qualifier Value field is not displayed. - If the Qualifier is mapped to a System Qualifier of BALANCE-LVL, BALANCE-CP-LVL or BALANCE-HOURS-LVL, the Qualifier Value field is not displayed and the Unit Level field is displayed. - If the Qualifier is mapped to a System Qualifier of BETWEEN, BETWEEN-CP or BETWEEN-HOURS, the Qualifier Value and Qualifier Upper Value fields are both displayed. If the Component Category is mapped to a System Component Category of UNITS or TEXT, then the following Qualifiers are not displayed: - EQUALTO-CMPNTS - UPTO-CMPNTS - ATLEAST-CMPNTS - BETWEEN-CMPNT If the System Component Category is COMPOSITE then all Qualifier records are displayed. Important: Only one Component with a BALANCE Qualifier can added to a Composite Component. Table Value: COURSE_PLAN_COMPONENT.QUALIFIER_CD |
|
| Qualifier Explanation | An explanation of the Qualifier specified in the previous field. For examples, see CRSW1050. Note: If a Qualifier Explanation exists, then this will override the Qualifier and Qualifier Value when viewed by an enquirer in the Course Plan Enquiry system. Therefore, the Qualifier Value (where applicable) should be incorporated into the Qualifier Explanation if the value needs to be displayed in the Course Plan Enquiry system. Table Value: COURSE_PLAN_COMPONENT.QUALIFIER_EXPLANATION |
|
| *Qualifier Value | A numerical value for the Qualifier, for example, the total number of credit points required to complete this Component. For Qualifiers with an Upper Value (see the Upper Value field, below), this field becomes the 'Lower Value' for the Qualifier. This field is NOT displayed if the Qualifier (entered in the Qualifier field, above) is: ALL, BALANCE, BALANCE-CP, BALANCE-HOURS, BALANCE-LVL, BALANCE-CP-LVL or BALANCE-HOURS. Note: If a Qualifier Explanation exists, then this will override the Qualifier and Qualifier Value when viewed by an enquirer in the Course Plan Enquiry system. Therefore, the Qualifier Value (where applicable) should be in corporated into the Qualifier Explanation if the value needs to be displayed in Course Plan Enquiry system. Table Value: COURSE_PLAN_COMPONENT.QUALIFIER_VALUE |
|
| *Upper Value | The 'upper value' for the Qualifier. Enter a numerical value. This field is only available if the Qualifier (entered above) is: BETWEEN, BETWEEN-CP or BETWEEN-HOURS. Note: The 'lower value' that accompanies the Upper Value is the value entered in the Qualifer Value field, above. Table Value: COURSE_PLAN_COMPONENT.QUALIFIER_UPPER_VALUE |
|
| Unit Level | The Unit Level defined in CRSF2140.
This is the institution-defined 'year level' in which the unit will be attemptied for the course, for example, '1' is a first year unit within a course, '2' is a second year unit within a course. For more information, see CRSF2140. This field is only displayed if the Qualifier is mapped to one of the following System Qualifiers: BALANCE-LVL, BALANCE-CP-LVL or BALANCE-HOURS-LVL. It replaces the 'Qualifier Value' field. Table Value: COURSE_PLAN_COMPONENT.UNIT_LEVEL |
|
|
The creation of a new Component is divided into two parts, as institutions may require two different user roles to perform this task. Part 1: Completion of the main fields (including all mandatory fields) - see steps 2 and 3(a), below. Part 2: (If you are authorised to add further details) - Linking Unit Sets and adding Units/Text and/or child Components - see step 3(b), below. These details must be defined before the Component can be used in a Course Plan Structure Version (CRSW2005). Note: Instructions for linking a Unit Set and adding Units/Text and/or child Components to the Component, vary according to the Component Category (CRSW1020) specified for the Component. See step 4, below. |
1. Click on the New icon on the Components (List) page. The New Component page is displayed.
2. Complete each field on the New Component page, as required. See Field Descriptions, above. Mandatory fields are marked with an asterix (*).
3. When you have completed all required fields, depending on your user role, either save the Component and exit the page or, if you are authorised to add further details, save the Component and continue adding details, i.e:
(a). (If you are not authorised to add further details) Click on the Create button to save the new Component and exit the page. A Component ID is automatically assigned to the new Component.
(b). (If you are authorised to add further details) Click on the Create & Specify Details button to continue adding details, such as, linking Unit Sets, and adding Units/Text and/or child Components, as required.
Important: If you did not perform Part 1 and it was completed by a different administrator, you must first find and open the Component from the Components (List) page, and link Unit Sets and add Units/Text and/or child Components from the Component (Edit) page.
4. Instructions for linking a Unit Set and adding Units/Text and/or child Components to the Component, vary according to the Component Category (CRSW1020) specified for the Component. For instructions, see:
If the Component has a Component Category value of UNITS, the Relate Unit Sets to Component and Relate Units to Component sections are displayed. From here you can link Unit Sets and add units to the Component. (For instructions, see 'To Link a Unit Set' and 'To Add Units', below).
1. Click on Add in the 'Relate Unit Sets to Component' section of the page. The Search and Select Unit Sets pop-up page is displayed.
2. In the Search and Select Unit Sets pop-up page find and select the required Unit Set. Click on the Use Selected button to return the Unit Set to the Component page.
3. Add Units to the Component, if required. See 'To Add Units to the Component', below.
| Important: 'Unit Sets' are linked (not 'added') to a Component and are used for reference purposes only. Unit Sets (CRSF4200) are used to define a path of study when adding units to the Component (for more information, see Understanding Course Structure and Planning). Unit Set Rules and Unit Set Completion Rules are set up for a Unit Set in CRSF4230. They are used to establish prerequisites, as required by the institution, and to define course completion requirements. They may or may not specify a list of units. Once a Unit Set is linked to a Component, all Unit Set Rules and Unit Set Completion Rules (including any specified required units) for the Unit Set, are displayed in the Information block on the Component page. These rules can be used as a guide when choosing units to add to the Component (see the 'To Add Units' steps, below). Linked Unit Sets can also be used in Search criteria, for example, in the situation where a Unit Set has changed and the user wants to find all Components to which the Unit Set is linked in order to add or remove units from the Component. |
1. Click on Add in the 'Relate Units to Component' section. The Search and Select Units pop-up page is displayed.
2. Find and select the required unit(s). Click on the Use Selected button to return the unit(s) to the Component page.
Details displayed for the added unit are sourced from the SMS Form CRSF2210.
| Column Title: | Description: | |
| Unit Code | The unit code and version number. UNIT_VERSION.UNIT_CD |
|
| Unit Title | The unit title. UNIT_VERSION.TITLE |
|
| Status | The insitution-defined status of the unit, which is mapped to a system unit status. For students to be enrolled in the unit, it must have a system status of ACTIVE. UNIT_VERSION.UNIT_STATUS |
|
| Credit Points | The Enrolled Credit Points for the unit version (sourced from CRSF2210). This is the number of credit points for the unit in which the student is considered to be enrolled. UNIT_VERSION.ENROLLED_CREDIT_POINTS |
|
| Hours | The total number of contact hours for the unit (supervised hours+unsupervised hours), sourced from CRSF2210. UNIT_VERSION.TOTAL_CONTACT_HOURS |
|
| Level | The Unit Level assigned to the unit version (sourced from CRSF2240) for the associated Course Type, i.e. the year level of the course with which the unit is associated. A unit can be associated with different Course Types, therefore a Unit Level may be assigned to the unit version for each Course Type with which it is associated. For example, unit HJ13012 - Social Science Research Methods may be taken as a third year subject in the Bachelor of Arts in Justice Administration, but as a first year subject in the Master of Criminal Justice. This unit could have a Course Unit Level of 3 in the undergraduate degree, and 5 in the masters degree. COURSE_UNIT_LEVEL.UNIT_LEVEL |
|
| Offerings | The Unit Offering for the unit (sourced from CRSF2310), i.e. The Calendar Type in which the unit is offered (for example, the definition of SEM-1 is semester 1 teaching period. TRI-2 is trimester 2 teaching period). Only current Unit Offerings with an end date equal to or greater than the date the unit is added to the component are displayed. Units are offered in instances of calendar types categorised as TEACHING calendars. UNIT_OFFERING.CAL_TYPE |
|
3. It is possible to add a condition using sql code to define a group of units with similar attributes. This is useful if you need to add a large number of related units and may be a preferable alternative to selecting individual units as described above.
Note: This option is only available if the Component Category value is UNITS and at least one unit has been added to the Component.
To Define a Group of Units:
a) In the WHERE field, write a condition using sql code. The sql text must be based on fields that exist in the UNIT_VERSION table. For example:
WHERE
title like '%CERAMICS' and version_number = 3
b) Click on the Test SQL button to check if the code is valid.
c) Click on the Show Results button to view the results.
4. Click the Save button to save the Unit details to the Component and return to the Components (List) page.
Alternatively, click the Save & New button to save and close the Component, and open the new Component page (from where you can create a new Component without having to return to the Components (List) page).
If the Component has a Component Category value of COMPOSITE, the Relate Unit Sets to Component and Relate Components to Composite sections are displayed on the Component page. From here you can link Unit Sets and add child Components, if required. (For instructions, see 'To Link a Unit Set' and 'To Add a Component', below).
A COMPOSITE Component (parent Component) is made up of one or more child Components arranged in a specific order for use in a Course Plan Structure Version (CRSW2005).
Note: Only one Component with a BALANCE Qualifier can be added to a Composite Component.
1. See the 'To Link a Unit Set' steps, above.
Note: Unit Set Rules and/or Completion Rules are displayed in the Information box for all child Components of a parent Composite Component. However, Unit Set Rules and/or Completion Rules related to the parent Component are not displayed.
1. Click on Add in the 'Relate Components to Composite' section. The 'Search and Select Components' pop-up page is displayed.
2. Find and select the required Component then click on the Add button to add the Component to the Composite Component and return to the Component page.
3. To add additional units, click on the Add icon and repeat the above steps.
To Change the Order of the Components:
4. If more than one Component is listed you can change the order of the Components in the list. Click on the Component that you want to move, then click on the Move Up or Move Down arrow to move it up or down in the list.
The order of Components displayed on this page will be the order of display within a CPSV (see CRSW2005).
To Specifiy the Credit Points, Units or Hours Range:
5. To specify the minimum and maximum number of Credit Points, Units or Hours for the Composite Component, enter the minimum amount in the From field and the maximum amount in the To field. This is also referred to as the 'Range'.
The Credit Points, Units and Hours 'From-To' Ranges are the minimum and maximum Credit Points, Units or Hours respectively, that are required to complete the requirements of the Composite Component.
Note: When the Composite group of Components is attached to a CPSV, the Credit Points, Units or Hours' From-To value must not exceed the corresponding From-To value specified for the CPSV (see CRSW2005).
To Specify the Year Level Values:
6. Click on the Breakdown per Level button to specify the Year Level minimum and maximum values for the Composite Component. The Breakdown pop-up page is displayed.
7. Enter the number of Credit Points/Units/Hours for one or more Year levels, as required.
The values defined for each Year Level must meet the Rule requirements of the associated Units.
The Composite's From-To values (i.e. 'range') are displayed at the top of the Breakdown pop-up page.
The total (sum) of 'From' values for all Year levels must be less than or equal to the 'To' value for the Composite Component.
For example, if a Composite's Credit Points Range is From 90 To 100, it can be broken down as:
In this example (above), the sum of defined Credit Points Year Level 'From' Values (95) cannot be greater than the Composite's Credit Point Range 'To' value, which in this case is 100. (If no Range value exists, but Unit Level values exist, then no check is performed by the system.)
7. Click on the Save button to save the Year Level Breakdown details and return to the Component page.
8. When you have finished adding details and defining Year Level values for the Component, click the Save button to save your changes and close the Component page.
Alternatively, click the Save & New button to save and close the Component, and open the new Component page (from where you can create a new Component without having to return to the Components (List) page).
If the Component has a Component Category value of TEXT, the Relate Unit Sets to Component and Text & Special Requirements sections are displayed on the Component (Edit) page. From here you can link Unit Sets and add text and special requirements, if required. (For instructions, see 'To Link a Unit Set', 'To Add Text' and 'To Add a Special Requirement', below).
Note: If the Component is currently associated with more than one CPSV or Composite Component, then the Text field is a display-only field and the Special Requirements field is not displayed.
1. See steps 1 to 3 of 'To Link a Unit Set', above.
1. Under the 'Text & Special Requirements' section, type the required text directly into the Text field. For example, you may want to define a subject area from which a potential student can choose a unit, or to specify a particular unit or unit set from another institution that a potential student can select for study.
2. Click the Save button to save the text and return to the Components (List) page. Alternatively, to add a Special Requirement, see the following instructions.
1. Click Add (located in the Special Requirements area below the Text box). The 'Search and Select Requirements' pop-up page is displayed.
2. Using the Requirement Code and/or Description fields, find and select the required Requirement. Click on the Use Selected button to add the Requirement to the Component and return to the Component page.
Note: Special Requirements are derived from the Special Requirement (CRSF4110) form.
3. Click the Save button to save the details and return to the Components (List) page.
Alternatively, click the Save & New button to save and close the Component, and open the new Component page (from where you can create a new Component, without having to return to the Components (List) page).
Once a Component has been created you can modify it or add new details, as required.
Component Changes that Affect CPSVs and Timelines: 3. The following Component changes will impact Timelines belonging to the associated CPSV:
|
1. Find and select the required Component from the list of records on the Components (List) page, then click on the Component ID to open the Component.
For more information about searching for a Component, see the Working with Lists overview Help page.
See the Field Descriptions table in the 'New Component Page' section, above, for a description of each field, including applicable Table values.
Information Box: |
2. Modify the Component details, as required. For field information, see Field Descriptions, above.
For instructions, see:
3. Click the Save button to save your changes and return to the Components (List) page.
To create a new Component with the same details as an existing Component, click the Copy Component icon or the Copy Component with Data icon on the Component page.
1. Find and open the required Component from the Components (List) page.
2. To create a copy of the Component without any details, click on the Copy Component icon.
Alternatively, to copy the entire Component including linked unit sets and/or units and child Component details, click on the Copy Component with Data icon.
A new Component (i.e. a copy of the existing Component) is created with a new Component ID.
3. Change or add field details for the new Component, as required. For field information, see Field Descriptions, above. For instructions, see:
Important: You must add a new Component Name before saving the Component.
4. When you have finished modifying the Component, click the:
Page last modified: 31 May, 2012 3:52 PM
History Information:
| Release Version: | Project: | Change to Document: |
| 15.0 | 1722 - Transform 10g to 11g | Updated Help page for 11g & incorporated the Help for CRSW2030 into this page. |
| 12.0.0.1 | 1453 - Course Plan Enquiries | Updated entire page. |
| 11.1 | 1447 - Course Plans | New page. |