| Top of Crs Plans | Crs Plans Overview | Table of Contents | Feedback |
This page is used to create or modify Timelines for a specific Course Plan Structure Version (CPSV) (CRSW2005).
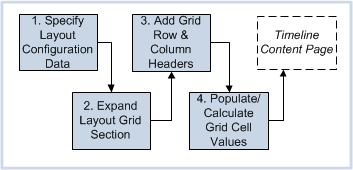
A Timeline is created by:
A Timeline is essentially a grid for a predefined time frame, for example, x (teaching periods) by y (years of undergraduate study), populated with units, credit points or hours (as specified for the associated course for the CPSV). This provides teaching period options for units selected by enquirers in the public-facing Course Plan Enquiry system.
It is expected that administrators will add all Components and units belonging to the CPSV into the Timeline grid. This will give enquirers a choice of teaching periods into which to place their chosen units when creating a Course Schedule.
It is anticipated that multiple Timelines will be created for a CPSV to provide enquirers with a choice of different course pathways in the Course Plan Enquiry system, and to cater for the different modes of study available for each course, for example, courses offered at different campuses, part-time, full-time, on-campus, etc.
A list of available Timelines for a chosen course is provided on the Schedule Units page in the Course Plan Enquiry system.
This page is accessed via the Timelines icon on the:
Page navigation from the Course Plan Structure Versions (CRSW2005) and CPSV Components (CRSW2040) pages to the CPSV Timeline pages (CRSW2015) is shown below.

This page displays a list of Timelines that have been created for the context CPSV. The CPSV details are displayed at the top of the page.
You can perform the following actions from this page:
For more information about working with the list of items in the table, see the Working with Lists Help page (currently under construction).
The New CPSV Timeline page is used to create a new Timeline Layout for the CPSV, and to specify the minimum number of units, credit points, or hours that can be added to each cell when creating the Timeline content.
On this page you:
Note: The Timeline content is created separately on the Timeline Content page.
The following tables describe all fields including applicable Table values located in all sections on the CPSV Timeline Layout page.
Fields in this section are display-only fields, sourced from the CPSV page (CRSW2005) for the context CPSV.
| Field: | Description: |
| Course Plan Structure Version | The [CPSV Code] .[CPSV Version number] - [CPSV Description], for example, M300.1 - Bachelor of Commerce. Table value: COURSE_PLAN_VERSION_TIMELINE.COURSE _PLAN_ID |
Credit Points | The minimum and maximum number of Credit Points for the context CPSV - as specified in the Breakdown From-To fields on the CPSV page (CRSW2005). These values cannot be changed once the CPSV has an associated open and confirmed Timeline. Table value: COURSE_PLAN_VERSION.CREDIT_POINTS_REQD_FROM COURSE_PLAN_VERSION.CREDIT_POINTS_REQD_TO |
| Units | The minimum and maximum number of units for the CPSV course - as specified in the Breakdown From-To fields for the context CPSV (CRSW2005). These values cannot be changed if the CPSV has an associated open and confirmed Timeline. Table value: COURSE_PLAN_VERSION.UNITS_REQD_FROM COURSE_PLAN_VERSION.UNITS_REQD_TO |
| Contact Hours | The total number of Contact Hours for the CPSV course - as specified in the Breakdown From-To fields for the context CPSV (CRSW2005). Used for VET sector courses. These values cannot be changed once the CPSV has an associated open and confirmed Timeline. Table value: COURSE_PLAN_VERSION.CONTACT_HOURS_REQD_FROM COURSE_PLAN_VERSION.CONTACT_HOURS_REQD_TO |
| Field: | Description: |
| Timeline Name | Unique name for the Timeline - automatically generated.
You can change the default name, if required. However, once the Timeline Configuration Data is saved, the name cannot be changed. When the Timeline is published in the Course Plans Enquiry system, the Timeline Name appears on the Schedule Units page. Table value: COURSE_PLAN_VERSION_TIMELINE.TIMELINE_NAME |
| Default checkbox | The default indicator. Only one Timeline can be the default.
A CPSV can have only one default Timeline. Table value: COURSE_PLAN_VERSION_TIMELINE.DFLT_IND |
| Closed checkbox | Closed indicator.
A closed Timeline can be re-opened at any time, by deselecting the checkbox. Table value: COURSE_PLAN_VERSION_TIMELINE.CLOSED_IND |
Course Completion Rules Information box - Displays the Course Completion Rules for the context course version(s). Sourced from CRSF4230.
An asterisk (*) indicates that the field is mandatory.
| Field: | Description: |
| *Number of Columns | The total number of columns (excluding the row headers column) for the Timeline grid that will be created and displayed in the Layout section of the page (below). For example, this might be the number of semesters in one teaching year, for example, SEM 1, SEM 2, SEM3. Therefore you would require three columns. Table value: COURSE_PLAN_VERSION_TIMELINE.NUMBER_OF_COLUMNS |
| *Number of Rows | The number of rows (excluding the column headers row) for the Timeline grid that will be created and displayed in the Layout section of the page (below).
For example, this may be the number of years a student can take to complete the course; for example, if the total course length is three years (at undergraduate level) then you could specify three rows. Table value: COURSE_PLAN_VERSION_TIMELINE.NUMBER_OF_ROWS |
| *Grid Type | The Grid Type determines how the Layout grid is built. Select the required Grid Type from the Selector pop-list . Possible values are:
Note: The spanning (merging) function for grid cells is only available for the COLUMN BY ROW Grid Type. Table value: COURSE_PLAN_VERSION_TIMELINE.S _GRID_TYPE |
| *Grid Order | The Grid Order determines the order in which units are added into the Timeline when creating a course Schedule in the Course Plans Enquiry system. It is also the order in which the cells are automatically populated in the Layout grid. Select the required Grid Order from the Selector pop-list. Possible values are:
Table value: |
| Grid Value | The total value (sum) of all individual cell values (i.e. credit points, units or hours) in the Layout grid (see To Create the Layout Grid, below). Ideally this value should equal the Breakdown To field value specified on the CPSV (CRSW2005) page, however, it can be less than this value, if required. The default value is the maximum number of Credit Points, units or hours specified in the Breakdown To field for the context CPSV (CRSW2005). You can change the Grid Value figure to a different value as long as it is within the range specified for the CPSV in the Breakdown From-To fields on the CPSV (CRSW2005) page - which are also displayed in the Context CPSV section at the top of this page. Table value: COURSE_PLAN_VERSION_TIMELINE.GRID_VALUE |
| Column Attribute | The column header values for the Layout grid. Possible values are:
Column header labels and descriptions are automatically populated when the grid is first created. However, you can manually change the labels and/or descriptions at any time, if required. (See To Create the Layout Grid, below.) Table value: COURSE_PLAN_VERSION_TIMELINE.COLUMN_PERIOD_TYPE |
| Row Attribute | The row header values for the Layout grid. Possible values are:
For more information, see the 'Column Attribute' description above. Table value: COURSE_PLAN_VERSION_TIMELINE.ROW_PERIOD_TYPE |
1. Enter values in the fields in the Layout Configuration section, in order to specify the Layout grid structure. For instructions, see the Field Details, above.
2. When you have completed all required fields, expand the Layout section to create and display the Layout grid. See To Create the Layout Grid, below.
Note: You can modify the Layout Configuration data at any time, if required. In this case, the Layout grid is automatically re-created and displayed; however, the cell values must be re-entered or re-distributed.
This section is used to calculate and populate cell values for the Layout grid based on the number of required credit points, units or hours specified for the CPSV. The Layout grid is created based on the Layout Configuration values specified in the previous section, above.
1. Expand the Layout section to create and display the Layout grid for the Timeline.
Create Column and Row Headers:
2. Create the header rows and columns by selecting a value from the Header field List of Values (LOVs).
If required, you can manually change the Description field of each column and row header.
For example, if you specified 'Teaching Periods' in the Column Attribute field in the Layout Configuration section, select the type of Teaching Period heading for each column (for example, Semester 1, 2 , 3 etc).
Likewise, if you selected 'Unit Level' for the Row Attribute field in the Layout Configuration section of the page, select the required year level heading (for example, 1, 2, 3) for each row.
Add Values to Cells:
3. Enter a value in each cell so that the sum of all cells is equal to or less than the Grid Value (see Layout Configuration, above). You can enter values:
You can vary the numbers for each cell, as required, as long as the total (sum) of all cells adds up to the CPSV specified Breakdown From value (see CRSW2005).
If the sum of all cell values equals an amount that is less than or greater than the specified Grid Value, then a MISMATCH warning message is displayed.
The value you specified for each cell in the Layout grid will be the minimum number of credit points, units or hours that can be placed in that cell by a prospective student when creating a Course Schedule in the Course Plans Enquiry system.
The Calculate Blank Cell Values button is used to calculate the values of all cells in the grid, or to calculate one or more blank cells - in this case the remaining amount is assigned evenly to the remaining cells.
If the Grid Value is not evenly divisible by the total number of blank grid cells, then any remaining amount is added to the last cell in the grid.
| In the situation where you manually enter values into some cells in the grid, but not all, you can use the Calculate Blank Cell Values button to automatically populate all remaining blank or cleared cells. In this case, cells with an existing valid value are not overridden. Note: Zero is considered a value and is not overridden. If the sum of all populated cells equals the specified Grid Value, then any blank cells will not be populated when you use the Calculate Blank Cell Values button and they will remain blank. |
Remove Values from Cells:
4. To delete a value from a specific cell, use the Delete key on your keyboard.
Alternatively, use the Clear Cell Values button to remove all values from the grid.
Caution: Do not use the Clear Cell Values button to remove individual cell values.
Merge Cells Using Span:
5. Grid cells can be merged if the grid has a Grid Type of COLUMN BY ROW. You can merge cells vertically or horizontally (to the right of) a selected cell.
The value displayed for the merged cell is the sum of the values of the individual merged cells.
To Unmerge Cells:
6. To split merged cells, click on the Span Split link in the merged cell.
Cell values are automatically re-calculated and the value of the previously merged cell is evenly re-distributed between each newly split cell.
7. When you are satisfied with the Layout grid, and no 'Mismatch' error is displayed:
You can edit an existing Timeline (for example to move, remove or add Units and/or Components from/to the Timeline), by selecting the Timeline on the Timeline (List) page and opening the CPV Timeline Content page.
Note: You can access the Layout page from the CPV Timeline Content page (via the Timeline Layout icon) to change Layout Configuration Data and/or the Layout grid, if required.
1. Find and select the required Timeline on the CPSV Timelines (List) page. The the CPV Timeline Content page is displayed.
2. Move, remove or add units and/or Components from/to the Timeline, as required. Then click the Save button.
3. To change the layout (Timeline grid), click the Timeline Layout icon, located at the top of the page. The Edit CPV Timeline page is displayed.
4. Expand the Layout section to display the Layout grid.
Note: If required, change the Layout Configuration data. The Layout grid is then automatically re-created based on the new configuration data.
5. Change the grid values as required. For instructions, see To Create the Layout Grid, above.
If you change the number of rows or columns, the population of cells in the Layout grid is reversed in reverse Grid Order (for example, if the Grid Order is LEFT TO RIGHT, TOP TO BOTTOM, the last row will be removed).
If you increase the number of rows and/or columns, there is no change to the existing allocation of values in the Layout gird.
Use the Calculate Blank Cell Values button to recalculate grid values (and redistribute the value across all cells).
Important: Cells cannot be merged once content is added to the Timeline on the CPV Timeline Content page.
6. Click the Save button to save your changes and return to the CPV Timeline Content page.
See the Course Plan Structure Version Help page (CRSW2005), for a diagram of the steps that may be followed to create a CPSV - including Timelines.
The CPSV Timelines page (CRSW2015) page is one of a number of pages that are used to set up Course Plan Structures for use in the public-facing Course Plan Structures Enquiry system. See the Course Plan Structures Overview Help page for more information and a diagram of related Course Plan Structure pages.
Last modified on 6 June, 2012 2:32 PM
History Information:
| Release Version | Project | Change to Document |
| 15.0 | 1722 - Transform 10g to 11g - Calipso 34264 | Updated page re: flow/navigation of pages |
| 15.0 | 1722 - Transform 10g to 11g | Updated page for 11g. |
| 13.0.0.2 | 1579 - Course Plan Enquiry | Added a new page image, updated the introduction, updated the Adding Units/Components section and the Unconfirming a Timeline section. Added information about the Confirm button. |
| 13.0 | 1579 - Course Plan Timelines | New page. |