| Top of CRS | Index | Table of Contents | Feedback |
This Help page includes the following information:
The purpose of transferring student results from an LMS to SMS is to reduce manual maintenance and reconciliation of data in both systems.
A log of all validation messages is kept in Callista. GENJ1100 is run to create an extract of the validation messages, if required.
A Callista SMS administrator runs the ASSJ5341 job to process the uploaded records and create Student Unit Attempt Outcomes.
If required, the ASSR06J0 report can be run to identify non-enrolled SUAOs. The 'Add Non-Enrolled Student Outcome' form (ASSF5333) may also be used, if required.
The following diagram shows the process of the transferring student unit grades from an LMS to SMS via the resultLoad web service.
Figure 1: LMS to SMS grades transfer process
_________________________________________
Currently, this section covers only the creation and maintenance of Cross-Listed units for the purpose of transferring them to an LMS. Details of the process that transfers unit data to the LMS, will be provided in a future release.
Important: It is intended that this section will also cover the download of Person, Enrolment, Organisational Unit and Unit data from Callista SMS to to an LMS, for the purpose of setting up a web learning site in the LMS. However, details of this process are currently unavailable and will be provided in a future release.
Note: Organisational Unit data must be transferred to the LMS before Enrolments commence to enable the institution’s administration staff to set up structures needed in LMS prior to the start of a semester.
Cross-Listings are created in Staff Connect for the purpose of transferring cross-listed unit data from Callista SMS to an institution's LMS. Each Cross-Listing is made up of a set of related units that deliver the same course material.
Selection of cross-listed unit data is Open Source, enabling institutions to customise the selection criteria that will determine the contents of the extract files.
The following diagram shows the main steps involved in the process of creating Cross-Listings and transferring unit data from SMS to an LMS. The process is highly configurable and is dependent on the configuration settings that have been specified in CRSF0100 and defined Open Source Routines (see Configuration Requirements, below).
Figure 2: Cross-Listing steps
_________________________________________
Note: Details of the Transfer process, including the web service and batch job, is currently unavailable and will be provided in a future release.
Data is extracted from SMS in accordance with the Learning Information Services (LIS) 2.0 specifications which define how systems manage the exchange of information. For more information, see the Technical documentation for Release 15.0.
Note: Security Roles are set up in SECF0011. (Grants are assigned to Roles in SECF0063.)
Configuration settings are specified in CRSF0100 and determine what the user can do and see in the Cross-Listing fields located on the Maintain Cross-Listing (SCCLMAIN) screen in Staff Connect when they create a Cross-Listing. In addition, defined Open Source routines are used to populate fields on SCCLMAIN, as required by the institution.
The following fields and check boxes in CRSF0100 are used to configure Cross-Listing fields located on the Maintain Cross-Listing screen (see 'To Create a Cross-Listing', below):
| Field/Check Box | Description |
|---|---|
| Cross-Listing Code | Used to specify the maximum number (between 1 and 100) of characters that can be added in this free-text field. |
| Short Name | Used to specify the maximum number (between 1 and 40) of characters that can be added in this free-text field. |
| Long Name | Used to specify the maximum number (between 1 and 100) of characters that can be added in this free-text field. |
| Auto Generate Cross-Listing Code (check box) | Used to turn on/off the CRSK_SET_CL_CD.CRSP_SET_CL_CD Open Source routine that generates a default Cross-Listing Code for the Cross-Listing Code field when a Cross-Listing is first created in SCCLMAIN in Staff Connect.
|
| Enable Cross-Listing Default Code Override (check box) | If selected (i.e. if 'Y') a default Cross-Listing code, displayed in the Cross-Listing Code field on the SCCLMAIN screen, can be changed, if required.
|
| Enable Cross-Listing Code Change after Loaded to LMS (check box) | If selected, you can change the Cross-Listing code of a Cross-Listing after it has been transferred to the LMS.
|
| Maximum Number of Units in a Cross-Listing | Enter the maximum number (1>10) of units that can be added to a Cross-Listing.The default number is 2. This option applies to the Unit fields in SCCLMAIN when creating or modifying a Cross-Listing. |
| Maximum Number of Teaching Periods in a Cross-Listing | Enter the maximum number (0>10) of Teaching Periods that can be selected, from which units can be chosen to add a Cross-Listing. The default number is 1. This option applies to the Teaching Period fields in SCCLMAIN when creating or modifying a Cross-Listing. |
The following Open Source routines may be defined by institutions, if required, and are used to populate the Organisational Unit, Cross-Listing Code, Academic Period and and Teaching Period fields located the SCCLMAIN screen, when a Cross-Listing is first created.
The Maintain Cross-Listing screen (SCCLMAIN) in Staff Connect is used to create or modify a Cross-Listing.
This screen is accessed via the New Cross-Listing button in the Search Cross Listings (SCCLSELECT) screen.
Note: To create a new version (i.e. a copy) of an existing Cross-Listing, select the Cross-Listing in SCCLSELECT to access the Cross-Listing in SCCLMAIN. (See 'To Modify a Cross-Listing', below.)
1. Click on the New Cross-Listing button on the Search Cross-Listings (SCCLSELECT) screen. The Maintain Cross-Listing screen (SCCLMAIN) is displayed.
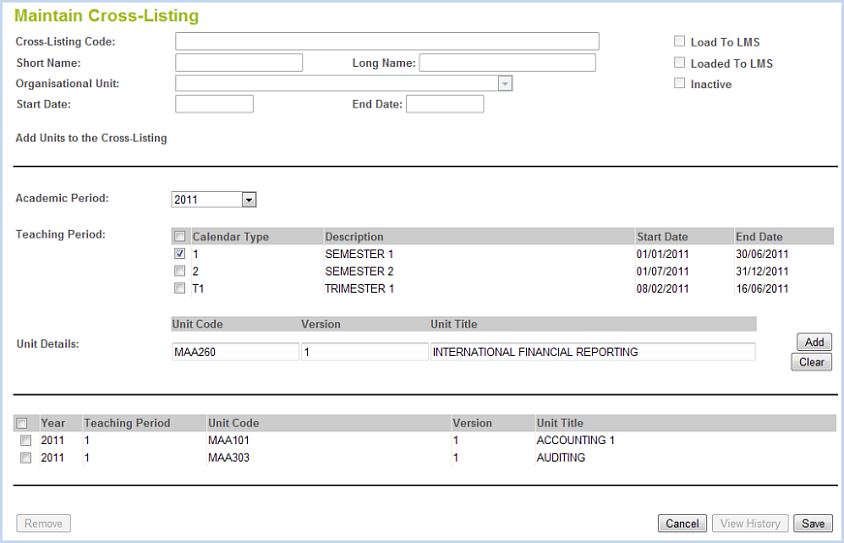
Figure 3: SCCLMAIN - Create - screen
________________________
2. On opening SCCLMAIN, the Open Source routine CAL_INSTANCE_CROSS_LIST_RES_V automatically populates both the Academic Period poplist and Teaching Period fields. If required, an institution can:
The fields in the top block of the SCCLMAIN screen are unavailable until all units have been added that will constitute the Cross-Listing and the user has clicked the Save button. (See step 7, below.)
The Load to LMS check box is used to indicate whether or not the Cross-Listing is ready to be loaded to the LMS.
The Loaded to LMS check box is used to indicate whether the Cross-Listing has been transferred to the LMS. It is controlled automatically by the system.
3. Select the required Academic Period.
4. Select the required Teaching Period(s).
5. In the Unit Code field enter or search for the Unit Code of the required unit to be included in the new Cross-Listing, then click on the Add button to add it to the Cross-Listing.
To find a unit, perform the following steps:
Only units with a System Status of ACTIVE in the selected Academic Period and Teaching Period(s) are returned.
6. To add an additional unit, perform the previous step (above) and click on the Add button to add it to the Cross-Listing.
If required, an institution can limit the number of units that can be added to a Cross-Listing be specifying a maximum number in the 'Maximum Number of Units in a Cross-Listing' field in CRSF0100.
To remove a unit, select the unit then click the Remove button.
7. When you have finished adding units, click on the Save button to create the Cross-Listing. The following actions are invoked:
In addition, the configuration settings specified in the 'Cross-Listing Configuration' form (CRSF0100) are also used to control aspects of these fields. For more information, see 'Configuration Requirements', above.
For more information also refer to the 'td_custom_source_code_summary' and 'td_connect' Technical documents delivered with the Callista SMS release.
8. All fields in the top block of the screen are mandatory. Once you have saved (created) the Cross-Listing, ensure that all fields in this block have been completed. Fields that are already populated can be modified, if required.
a). Enter a value in the Cross-Listing Code field. Alternatively, if this field was automatically populated (i.e. if the 'Auto Generate Cross-Listing Code' check box is selected in CRSF0100) and the 'Enable Cross-Listing Default Code Override' check box is selected in CRSF0100, you can change the default value displayed in this field, if required.
b). Enter values in the Short Name and Long Name fields. These are free-text fields. The maximum number of characters that can be entered in these fields is specified in CRSF0100.
c). Select a value from the List of Values for the Organisational Unit field.
d). The Start and End Date fields are automatically populated and cannot be modified. The Start Date is the earliest Start Date of the added units that constitute the Cross-Listing. The End Date is the latest End Date of the added units.
e). If required, select the 'Load to LMS' check box to flag the Cross-Listing as ready to be loaded to the LMS.
9. Click on the Save button.
You can modify or view a Cross-Listing at any time in the Maintain Cross-Listing screen (SCCLMAIN).
Important: When you make a change to a Cross-Listing, effectively a new version (i.e. a copy) of the Cross-Listing is created. The previous version of the Cross-Listing can be viewed in the Cross Listing History Inquiry screen (SCCLHIST).
1. Search for the required Cross-Listing in the Search Cross-Listing screen (SCCLSELECT). For instructions, see the 'To Search for a Cross-Listing' steps, below.
2. Click on the required Cross-Listing Code in the Search Results table to access the Cross-Listing on the Maintain Cross-Listing screen (SCCLMAIN).
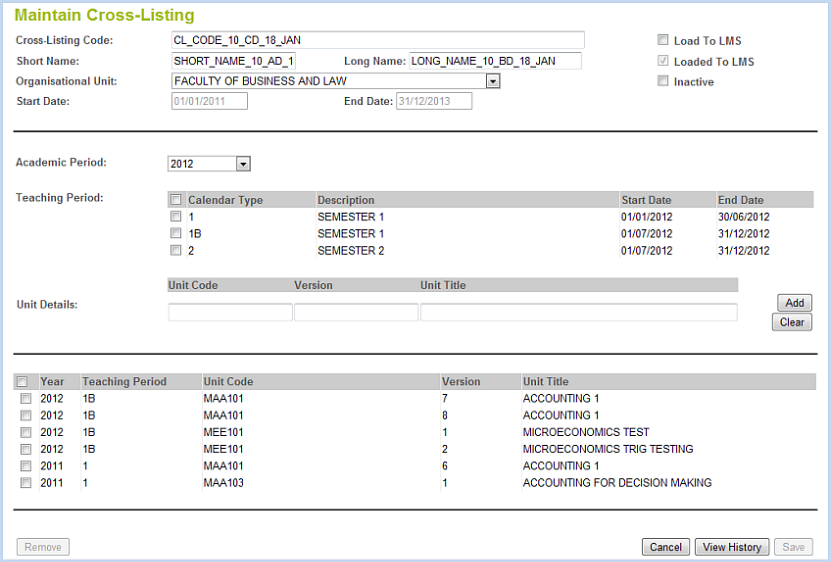
Figure 3: SCCLMAIN - Modify - screen
________________________
3. You can make the following changes to a Cross-Listing on the SCCLMAIN screen, if required:
Note: In all cases listed below, when you make a change to the Cross-Listing it overrides the previous version and a new copy of the Cross-Listing is created on saving. The previous version is available for viewing in the SCCLHIST screen:
Notes:
4. Click Save to save your changes.
If the Loaded to LMS or Load to LMS and/or Inactive check box were selected for a Cross-Listing, when you save your changes, these indicators are automatically deselected as they are only valid for the previous version of the Cross-Listing. (The previous version with the 'Loaded to LMS' or 'Load to LMS' flag, is available for viewing in the SCCLHIST screen.)
The Search Cross-Listings screen (SCCLSELECT) is used to search for Active and/or Inactive Cross-Listings, and perform one or more of the following actions for one or more selected Cross-Listings:
This screen is accessed from the main menu in Staff Connect.
1. Select the 'Search Cross-Listings' Cross-Listing menu item from the main menu in Staff Connect.
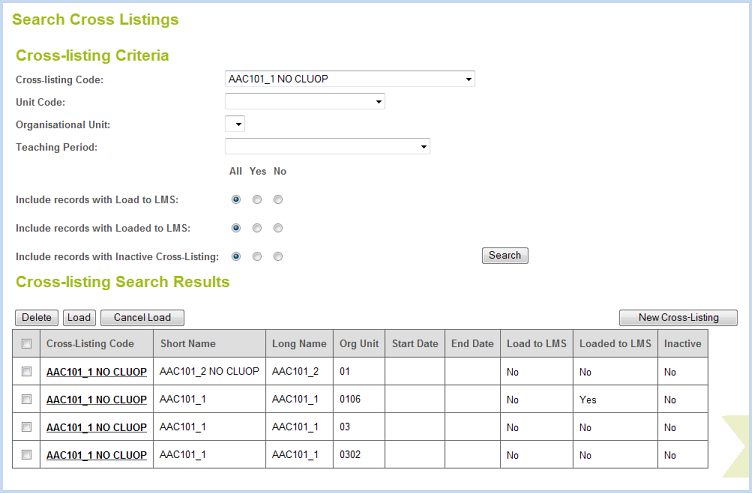
Figure 4: SCCLSELECT screen
________________________
2. Search for a Cross-Listing using one or more of the following search criteria:
3. To execute the search, click on the Search button. The retrieved Cross-Listing(s) are listed in the Cross-Listing Search Results table.
4. You can select single or multiple Cross-Listings and perform one or more of the following actions:
Important: When a Cross-Listing has been successfully transferred to the LMS, the Loaded to LMS value is automatically set to 'Yes'. In this case you cannot use the Load, Cancel Load, or Delete buttons for this Cross-Listing.
On this screen you can also:
The Cross-Listing History Inquiry screen (SCCLHIST) shows a complete history of previous versions of a Cross-Listing including all saved changes that have been made to the Cross-Listing, and previous versions that have been transferred successfully to the LMS.
This screen is accessed via the Cross-Listing History Inquiry button in SCCLMAIN for a specific Cross-Listing.
There are two tables on this screen:
Page Last
Modified on:
22 February, 2012 1:52 PM
History Information:
| Release Information | Project | Change to Document |
| 14.0.0.2 | 1738 SMS-LMS Interface | New page |