| Top of OVW | Index | Table of Contents | Feedback |
This section is an introduction to the features, facilities and processes which are available throughout the System.
The System has been designed and built to a set of standards which ensure consistency in the appearance and use of such areas as:
Learning to understand and use these key areas of functionality is the most important step in being able to get the most from the System. Armed with this knowledge, you will be able to make the System work for you.
NOTE: For understanding on obscure icons, images and buttons that may only be used occasionally within forms or jobs, see System Icons (OVW06).
The System is designed around a modular structure. At the highest level the System is broken down into Subsystems representing broad business functions such as Enrolments and user facilities such as Correspondence. This is illustrated under the System Diagram section.
Within each Subsystem the modular design continues, with individual forms being used to perform low level business operations. For instance, within the Course Structure and Planning Subsystem there are separate forms to perform operations such as:
The modular approach is continued in areas not obvious to users, such as data validation.
System menus permit the selection of, and navigation between, parts of the System. The menu structure is determined by an institution, and set up by a Callista security administrator. Individual users may see different menu structures.
Form Layout, Structure and Design
Forms are the mechanism by which you access the functionality of the System. They are what you see on the screen and are defined by Oracle as 'a group of related blocks'. They are used to manage the flow of data into and out of the System and to control much of the activity within the System. Pictured below (fig. 1.12) is a typical SIS form with its major components labelled.
fig. 1.12 - Typical SIS form. (ovw09)
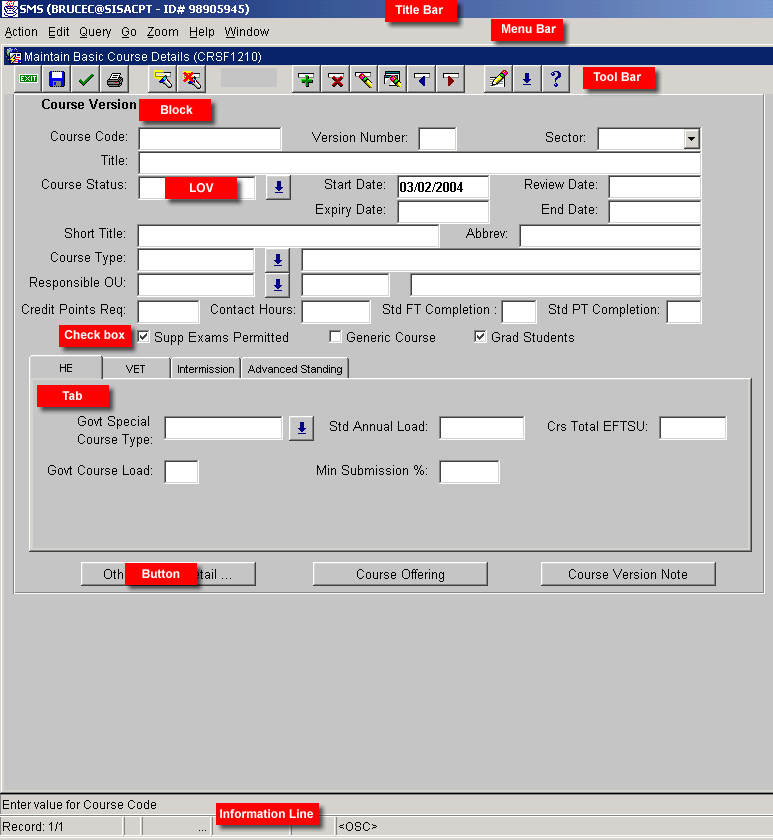
Blocks are parts of a form usually identified by being contained within separate boxes as shown in the previous picture (fig. 1.12). A form may contain one or more blocks. In most cases, a form is divided into blocks to show that data, while related, is not part of the same record. A block can only contain data from one database table. A block may also contain other items such as buttons. This is further explained below.
The data contained within a block generally represents all or part of a record. A record is an item of information about an individual thing such as a specific course. Technically, a record is one row of a database table. Some blocks are designed to display more than one record at a time.
fig. 1.13 - A Form Containing Single Record Blocks. (crsf1210)
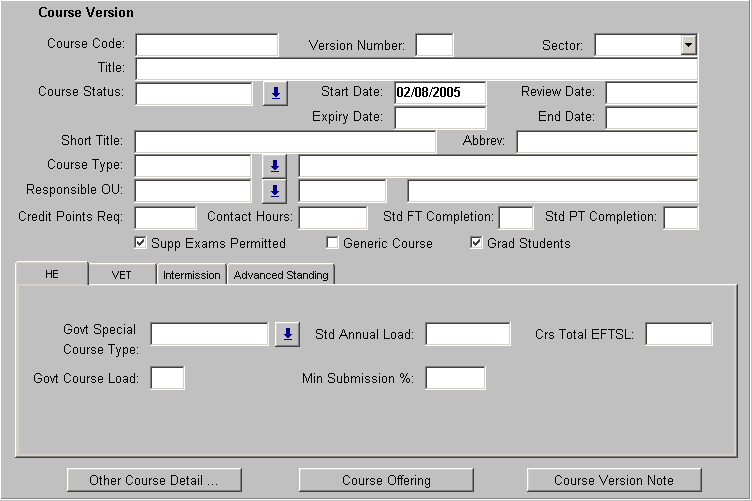
In this form, all the displayed data is part of one record.
fig. 1.14 - A Form With a Multiple Record Block. (crsf1500)
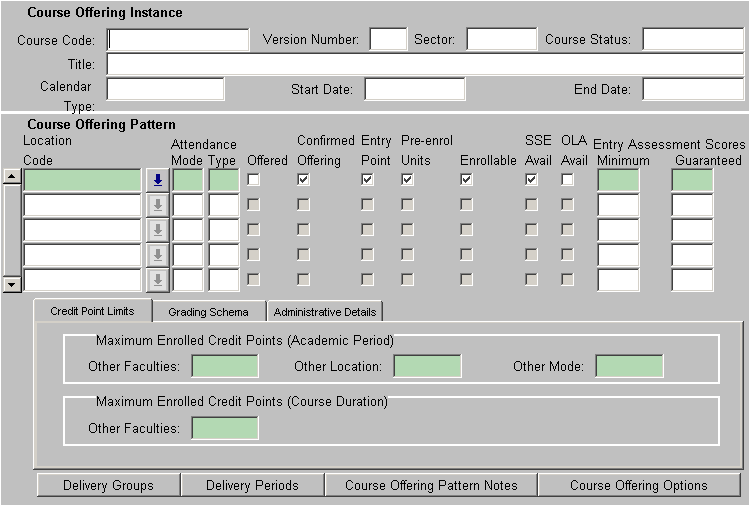
In this form, the Course Offering Pattern block contains multiple records. At the bottom of the form is a boxed area devoted to cross credit point information. Such areas are known as overflow areas. Note that the overflow area contains data only for the record selected (shaded) in the Course Offering Pattern block.
Context Within a Form
In some cases, information may be made up of a set of similar data. For example, a single course may be offered both on and off campus. In this case a single record could not define the two different modes of course delivery. Two records are necessary, one defining the on campus mode and one defining the off campus mode. Rather than repeat all the common information about the course, the data is split so that the common course information is a single record called the context record (or parent record) and the delivery modes are two separate but related records called children records. This is illustrated in fig. 1.14. The detail in the Course Offering Instance block is the context record for which all the available Course Offering Patterns are displayed. The detail on each line in the Course Offering Pattern block is a related child record.
Context Between Forms
Besides being represented within a form, context records may in some cases transfer between forms. In the example above (fig. 1.14) the Course Version in the Course Offering Instance context record was initially located (queried) in the Maintain Basic Course Details form (fig. 1.13). This record was then carried forward when the Course Offering button was selected.
Spread tables are a special method for the display of data. They permit records which are too large to be easily displayed on a single line to be viewed by incorporating a scrollable spreadsheet (a table of data) into the form. The Spread table displays additional data for all the records currently on the screen. The two pictures below illustrate the use of a Spread table. Scroll bars at the bottom of the spreadsheet permit additional data to be viewed. Fig. 1.15 shows the Spread table in the Maintain Calendar Types form scrolled to its extreme left. Fig. 1.16 shows the same Spread table scrolled to its extreme right. Note: when editing data in Spread tables you need to use Tab key and Shift-Tab rather than the scroll bar to navigate.
fig. 1.15 - Spread table [Left] (ovw19)
fig. 1.16 - Spread table [Right] (ovw20)

Overflow areas are another method used to display data where a record is too long to fit onto a single line. In this case an overflow area at the bottom of the screen contains the additional data for a selected (highlighted) record. The major difference between Spread tables and overflow areas is that a Spread table displays data for more than one record while an overflow area displays data for one record at a time. The use of an overflow area is illustrated in the form pictured below (fig. 1.17).
fig. 1.17 - Overflow Area (crsf1500)
The boxed area at the bottom of the form containing the Maximum Cross Credit Points information is additional data from the selected Course Offering Pattern record. Selecting a different Course Offering Pattern will cause the Maximum Cross Credit Points information for that record to be displayed.
Various different types of fields are used within the System. Each different Field Type is used for a specific purpose, either to assist and guide data entry or to accommodate specific data options such as yes/no type data. The different types of fields are discussed below along with the data entry options associated with them. Further information regarding the entry of data is contained in the section of this chapter titled 'Inserting Data'.
Some fields are described as Mandatory for the entry of data. These fields are identified by an 'N' in the Optional check box of the Field Help form for the field. You must enter a valid value in a Mandatory field otherwise you will be unable to navigate to another field or to update the record.
Optional fields are those for which the entry of data is not compulsory. They are identified by a 'Y' in the Optional check box of the Field Help form for the field. Records may be updated without any data being entered in an optional field.
Formatted fields are those which will only accept data which is entered in a specific format. All fields have some formatting associated with them whilst some are very prescriptive in the way data must be entered. For example, a number field will only allow the entry of numbers, a date field will only permit the entry of dates.
Some fields have very specific formatting which limits the entry of data to a set of values. For example, a number field may be formatted to accept only numbers of the form 99.999. This means that only values falling between 0.001 and 99.999 may be entered. (fig. 1.18)
fig. 1.18 - Typical field format message. (ovw21)

Other fields have very specific ranges for the data which may be entered. Fig. 1.19
fig. 1.19 - Typical field range message. (ovw22)
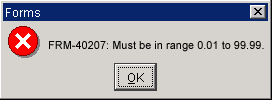
Field formats are displayed in the Field Help form for each field. This specifies the type and length of field. An easier option for determining the format of a field is to enter data in a field; if the format is incorrect a message such as those shown above will display on the screen specifying the correct format.
Check box fields are used for data with only two possible values. The value to be entered can usually be determined by a YES or NO answer to a question about the data. For example, in the case of closed check boxes, the answer to the question "is this record closed?" could be answered "yes" (in which case the check box is selected) or "no" (in which case the check box is deselected).
Fig. 1.20 shows a typical use of check boxes as closed check boxes. The Course Status FUTURE has its closed check box selected, meaning yes, the course status is closed and is no longer available for use. The other course statuses are not selected, meaning no, they are not closed and are available for use.fig. 1.20 - Checkboxes (ovw23)

Throughout the manual you will see the term 'select'. When this term is applied to fields, for example "select field x", it simply means to place the insertion point (usually a flashing vertical line) in the field. This is achieved by:
In the case of check boxes, selecting a check box results in an 'x' being displayed, i.e. a value is placed in the field (normally meaning "yes").
Deselecting most fields can be achieved by selecting another field. In the case of check boxes, deselecting means to click on a check box containing an 'x' thus removing the 'x'. The resulting empty check box usually means 'no'.
Illegal (or Reserved) Characters
The System does not have any characters which are 'illegal'. There are, however, a number of characters which you should avoid including in data. The main reason to avoid the use of these characters is that they may produce unpredictable results during data queries.
Characters to be avoided are:
| All punctuation marks | ! " , : ; ' . ? | |
| Special characters | # $ % & _ * | / \>< | |
| Arithmetical operators | = + - |
Some of these characters are used during searches, during arithmetical calculations or may be used differently by different users. Their use could result in the retrieval of extra records or the omission of records during queries.
List of Values (LOV) and Their Use
Throughout the System, you will see some fields which have an arrow next to them as shown below in fig. 1.21.
fig. 1.21 - List of values field (ovw24)
![]()
The arrow indicates that a 'list of values' (LOV) exists for this field. A list of values contains all of the valid values for data which may be entered in the field. The 'list of values' is maintained elsewhere in the System, either by users or as System defined data. Lists of values may contain not only the particular piece of data to be entered in the field but also other information to assist in the selection of the correct data value.
A System Defined Value is a database field in which all of the possible values are written into the System by programmers. The System uses these values to control functionality within the System. Users are unable to add, modify or delete any of these values. System Defined Values are usually identified by having 'System' as part of their field name. For example, a System defined, status field may have a value ACTIVE. The System will recognise that this value has some associated functionality.
An Institution Defined Value is a database field in which the data values are determined by the institution owning the database. This term applies particularly to those data elements which will later be used in the definition of other data. For example, an Institution Defined Status field may contain the value CURRENT. This value may then be used to define other data and would indicate that that data is currently applicable.
In many cases, Institution Defined Values are 'mapped' (linked) to System Defined Values so that the System can apply the functionality of the System Defined Value to the data defined by the Institution Defined Value. For example, an Institution Defined Value of CURRENT for a status field may be mapped to a System Defined Status of ACTIVE. Thus, any data defined by the value CURRENT will be recognised by the System as being active and will have appropriate functionality applied to it.
It is possible for many Institution Defined Values to be mapped to one System Defined Value. It is important to understand exactly what functionality this mapping process brings to the Institution Defined Value.
Selecting From a List of Values
A list of values is invoked (activated) by selecting (clicking on) the arrow beside the field in which data is being entered. (An identical arrow in the Tool Bar could also be used) A drop down list is displayed. For example, selecting the arrow to the right of the Course Status field in fig. 1.21 causes the list of values in fig. 1.22 to be displayed. This list contains all the possible valid values for the field. Long lists of values will have scroll bars at the side, enabling you to scroll through the list until the required value is located.
fig. 1.22 - List of Values (ovw25)
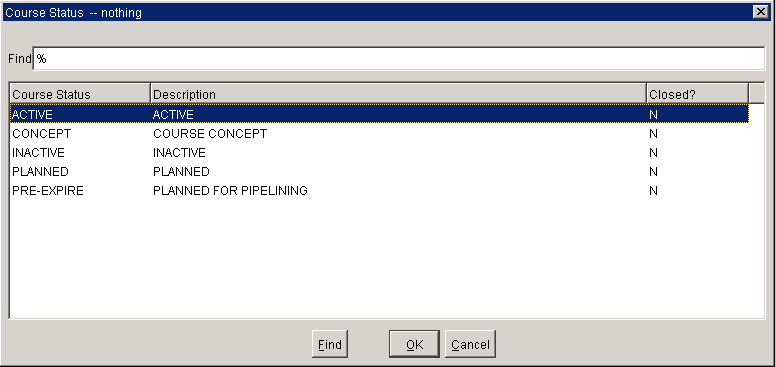
In some cases, where a list of values is especially long, it is possible to reduce the number of displayed values in the list by performing a query on the list using your knowledge of the expected value you are seeking. For example, in fig. 1.22, we could enter A% (% is a wild card) in the Find box, select the Find button and all values fitting the search criteria (ie. beginning with A) will be displayed. In this case only ACTIVE would be displayed.
To select a value from a list of values either:
The list of values will close and the chosen value will be displayed in the form.
Hint: You can speed the selection of data from a LOV if you know how the data starts. Rather than selecting the LOV button, you can enter the first one or first few characters of the data value in the field and hit Tab. If the characters you entered are unique to one data value, that value will be inserted in the field. If the characters are not unique, the LOV will display only those values beginning with the characters you entered.
The ability to add notes to data has been included throughout the System.
Notes facility is provided in many Subsystems. These notes are usually attached to functionality associated with a specific business function. They permit the recording and display of information in TEXT format.
Notes relating to a Student's Enrolment belong to two Note Type Groups:
The use of the Notes facility is described in detail in the chapter for each Subsystem in which the facility is available.
Interpretation of 'greyed out' Areas of Forms
You will often come across forms in which menus, fields and buttons are 'greyed out', that is, they appear as a fainter, lighter grey. Greyed out parts of a form indicate that use of that part of the form is unavailable to you at that time. In the case of menus, this usually means that you do not have the necessary security permissions to access the part of the System indicated by the menu option. In the case of fields, use may be restricted because the field is not accessable in the mode in which you are operating or because of a restriction on access to data. In the case of navigation buttons, it means that this navigation option is not available. Fig. 1.17 contains a number of fields which are 'greyed', including Title and Course Status. In this case the fields are unable to be updated within the form. Fig. 1.27 shows 'greyed' menu items CUT and COPY in the EDIT menu, signifying that the cut and copy options are not currently available.
At the bottom of each System form are two information lines (fig. 1.23). These are:
fig. 1.23 - Information lines (ovw26)

The message line may display Oracle Forms messages, such as instruction, error and warning messages for standard Oracle operations. For instance, if you try to scroll to the next record when all the records related to the current query have been displayed, Oracle Forms displays the message, "FRM-40352: Last record of query retrieved". In fig 1.23, the message line is providing instructions for using the current mode (in this case Query mode).
The Status Line may contain the following check boxs which provide information about the current operation you are performing:
| Indicates that there are records above the currently selected record in the block. | |
| v | Indicates that there are records below the currently selected record in the block. |
| Count | Indicates the number of records retrieved and displayed by a query. Each time you display a record fetched by a query, the count is increased. After you fetch the last record, an asterisk (*)is displayed before the count. The count does not reduce when you scroll backwards through retrieved records. |
| ENTER QUERY | Indicates you are in Enter Query mode. Enter Query mode allows you to specify query conditions. |
| <List> | Indicates that there is a list of values (LOV) associated with the current item. |
In fig. 1.23, the Status Line is indicating that the session is in Query mode. The Count check box is *0 indicating that no records have been retrieved as yet.
Navigation Methods and Standard Functions
Navigation is the term used to describe how you negotiate your way around the System. Throughout this manual the expression "navigate to a particular form, block or field" is used. This assumes that you understand the navigation options available to you. These navigation options are described below.
Standard functions are the usual functions associated with most Systems such as saving data and printing. The standard functions included in the System are described below.
fig. 1.24 - Standard Forms Tool Bar (ovw16)
![]()
The picture above is of the standard System Tool Bar. This will appear above most forms in the System. The individual Tool Bar items are described below. Many System operations can be performed from the Tool Bar. Tool Bar operations are selected by a single mouse click on the required Tool Bar item. Note that most of the Tool Bar functions may also be performed by the Menu Bar or Function Keys. Report and Job parameter forms use a different toolbar. Refer to All About Standard Reports.
Closes the current form and returns to previous form or menu.
![]()
Saves or commits current record to the database.
![]()
Saves current record to database but also puts block in New Record mode ready for insertion of new record.
![]()
Prints the current form and displayed record(s) to selected printer.
![]()
Selecting once places the form into Query mode and permits any query criteria to be entered. Selecting a second time executes the query.
Cancels the current query prior to executing it. Returns to Enter/Edit mode.
Indicates that the form is in Query mode.
![]()
Places the block in Insert mode ready for the inserting of a new record.
![]()
Removes the current record from the database. Note that the record is not deleted until the transaction is saved.
![]()
Clears the current record from the form without deleting it from the database.
![]()
Clears all field information from the form. If a field is modified and the 'Clear All' button selected, a pop-up screen will ask 'Do you want to save the changes you have made'. Selection is 'Yes' - 'No' or 'Cancel'. If 'Yes' is selected, the modified field is saved and all fields cleared. If 'No' is selected, the modified field is not saved and all fields cleared.
![]()
Moves the cursor to the previous record within the current set of records in the block. Next Record.
![]()
Moves the cursor to the next record in the current set of records in the block. If there are no more records in the set, moves to the first blank record.
![]()
Displays a separate window for editing the current field. Useful where the full length of the field is not displayed on the form.
![]()
Displays the list of allowable values which may be inserted in the current field. It has the same function as the LOV button adjacent to the field.
![]()
Displays the Field help form for the current field. Buttons that take the user to an on-line user manual are contained in Field Help form.
Function Keys and Key Sequences
Some System operations can be performed using a sequence of keyboard strokes. Users will find that for some operations under certain conditions a keyboard sequence may be quicker and easier than menu selection or Tool Bar selection. The available key sequences are described in the following section headed Menu Bar. A list of key sequences is also displayed when the Keyboard Help option is selected from the Help menu on the menu bar.
fig. 1.25 - Standard Menu Bar (ovw17)
![]()
The picture above is of the standard SIS menu bar as it looks on machines using Windows 95 or NT4. This will appear above most forms in the System. The individual menu bar items and their drop down menus are described below. Most System operations may be performed from the menu bar. Menu items are selected by clicking on the required menu bar item and then clicking on the required item in the drop down menu which is displayed. Note that many of the menu bar functions may also be performed by the Tool Bar icons or Function Keys.
Report and Job parameter forms use a different menu and toolbar. Refer to All About Standard Reports.
In the following sections, the menu items and their drop down menus are discussed in detail. Where there is an alternative Tool Bar icon or key sequence for the same function, this is shown.
Windows menu (ovw44)
The Windows menu is not used for any specific functionality within this System.
fig. 1.26 - Action menu. (ovw10)
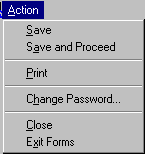
| Action Menu Items | |||
| Item | Tool Bar | KeySequence | Description |
| Save | F10 | Saves or commits current record to the database. | |
| Save and Proceed | Saves current record to database but also puts block in New Record mode ready for insertion of new record. | ||
| Shift + F8 | Prints the current form and displayed record(s) to selected printer. | ||
| Change Password | Displays a window in which the user can change their password. | ||
| Close | Ctrl + q | Closes the current form and returns to the previous form or menu. | |
| Exit Forms | Returns user to menu. | ||
fig. 1.27 - Edit menu. (ovw11)
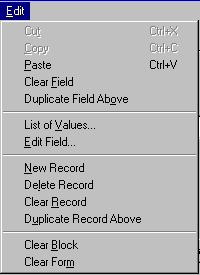
| Edit Menu Items | |||
| Item | Tool Bar | Key Sequence |
Description |
| Cut | Ctrl + x | Deletes the highlighted data from the database. The data is temporarily saved to your computer's 'clipboard' and may be pasted into another field. | |
| Copy | Ctrl + c | Copies the highlighted data. The data is temporarily saved to your computer's 'clipboard' and may be pasted into another field. | |
| Paste | Ctrl + v | Pastes the contents of your computer's clipboard into a selected field. The clipboard contents may be sourced from outside SIS if required. | |
| Clear Field | Ctrl + u | Clears current field without deleting the record. Is used when the record has not been saved and it is necessary to remove an erroneous value from the field. | |
| Duplicate Field Above | F3 | Copies and pastes corresponding field value from previous record into the current field of the current record. (ie. the highlighted record) | |
| List of Values (LOV) | F9 | Displays the list of allowable values which may be inserted in the current field. It has the same function as the LOV button adjacent to the field. | |
| Edit Field | Ctrl + e | Displays a separate window for editing the current field. Useful where the full length of the field is not displayed on the form. | |
| New Record | F6 | Places the block in Insert mode ready for the inserting of a new record. | |
| Delete Record | Shift + F6 | Removes the current record from the database. | |
| Clear Record | Shift + F4 | Clears the current record from the form without deleting it from the database. | |
| Duplicate Record Above | F4 | Copies and pastes entire previous record into current record, when in Insert mode. The record may then be edited as necessary. | |
| Clear Block | Shift + F5 | Clears all displayed records from current block, without deleting them from the database. | |
| Clear Form | Shift + F7 | Clears all displayed records from current form, without deleting them from the database. | |
fig. 1.28 - Query menu. (ovw12)
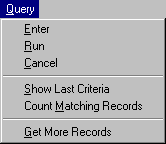
| Query Menu Items | |||
| Item | Tool Bar | Key Sequence | Description |
| Enter | F7 | Places the form into Query mode. | |
| Run | F8 | Executes the query specified in enter query. | |
| Cancel | Esc | Takes form out of Query mode and places it in Insert mode. | |
| Show Last Criteria | Displays the last query executed. | ||
| Count Matching Records | Shift + F2 | Displays the number of records that will be retrieved should the currently entered query be executed. Use to check that a query will not return an unmanageable number of records. | |
| Get More Records | Displays next set of records in retrieved set where it is not possible to display all retrieved records concurrently. | ||
fig. 1.29 - Go menu. (ovw13)
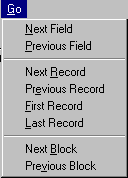
| Go Menu Items | |||
| Item | Tool Bar | Key Sequence | Description |
| Next Field | Tab | Moves the cursor to the next field in which data can be entered. | |
| Previous Field | Shift + Tab | Moves the cursor back to the previous field in which data can be entered. | |
| Next Record | Down Arrow or Page Down | Moves the cursor to the next record in the current set of records in the block. If there are no more records in the set, moves to the first blank record. | |
| Previous Record | Up Arrow or Ctrl + p or Page Up | Moves the cursor to the previous record within the current set of records in the block. | |
| First Record | Moves the cursor to the first record in the current set of records in the block. | ||
| Last Record | Moves the cursor to the last record in the current set of records in the block. | ||
| Next Block | Ctrl + Page Down | Moves the cursor to the first field of the first record in the next block of the current form. | |
| Previous Block | Ctrl + Page Up | Moves the cursor to the first field of the associated record in the previous block of the current form. | |
Zoom menu (ovw45)
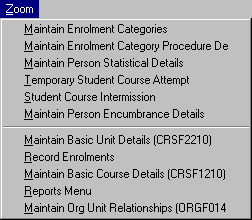
| Zoom Menu Items | |||
| Item | Tool Bar | Key Sequence | Description |
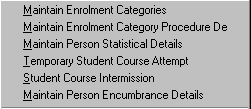 |
The upper list in this menu is maintained by the System Administrator and permits direct navigation to each of the forms listed. | ||
 |
The lower list in this menu contains the forms you have specified in your 'Favourites menu'. | ||
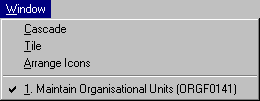
fig. 1.30 - Window menu. (ovw14)
| Window Menu Items | |||
| Item | Tool Bar | Key Sequence | Description |
| Cascade | Cascades the active SIS windows, one behind the other. | ||
| Tile | Tiles the active SIS windows, side by side. | ||
| Arrange Icons | Not applicable to SIS forms. | ||
| Open Windows List | Lists all active SIS windows. Making a selection from this list will result in the selected window becoming current. | ||
fig. 1.31 - Help menu. (ovw15)
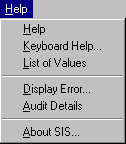
| Help Menu Items | |||
| Item | Tool Bar | Key Sequence | Description |
| Help | F1 | Displays the Field help form for the current field. Navigation buttons to on-line user manual are contained in Field Help form. | |
| Keyboard Help | Ctrl + F1 | Lists the keystrokes/sequences for common operations. | |
| List of Values | F9 | Displays list of allowable values which may be inserted in the current field. It has the same function as the LOV button adjacent to the field. | |
| Display Error | Shift + F1 | Displays details of most recent error in status bar. | |
| Audit Details | Displays the user name of the person who last updated any field in the current record as well as the date & time of the change. | ||
| About SIS | Displays release, copyright and disclaimer information about the System. | ||
A number of buttons are contained within forms. These buttons perform the following specific functions.
| Zoom buttons | Are used to promote or demote records to the position of context record in network forms. These forms display the hierarchical relationships between records. | |
| Navigation buttons | Navigation buttons provide direct access to other forms or menus. The destination is written on the button. The button illustrated would cause the maintain fields of study form to be displayed. | |
| List of Value buttons (LOV) | Displays the list of allowable values that may be inserted in the current field. It has the same function as the LOV button in the Tool Bar. | |
| Find Person | Opens the Find Person form (ADMF1211) where queries can be performed on a broad range of fields to retrieve a person known to the System. | |
| Add Person | Opens the Add Person form (ADMF1213) where new people can be added to the System. For example: staff members, contractors. | |
| History | Displays a history of changes for the associated field. | |
| Person Image | Opens the Person Image form (ENRF3510) and displays a recorded image of the person. |
Moving Between Fields (Within Blocks)
There are a number of ways to move between fields in which data can be entered. You will already know that a flashing insertion point in a field means that the field is selected.
To move the insertion point to another field you can:
To move the insertion point to another block one of the following methods can be used:
The methods for moving between forms are:
The ability to open multiple forms within a single session is not currently available. More than one form may be opened concurrently by running multiple sessions.
More than one form may be opened on your computer at any given time. This is achieved by starting a new SIS session for each concurrent form you wish to open and toggling between the active sessions in the same way that you toggle between different applications. In the case of PCs this is achieved by the keyboard combination ALT+TAB.
Modes of Access and Data Management
The Oracle Database Management System uses a slightly different approach and terminology to most other Systems in the way the database is accessed. Oracle has two modes of access. These are:
The majority of forms within the System permit users with adequate security permissions to access forms in both modes. In this case the default mode on first opening a form is Normal Mode. Some forms are specially designed to permit use in Enter Query Mode only. In this case Enter Query Mode is their default mode.
This is the process which permits retrieval and viewing, on screen, of information stored within the SIS database. The query process operates within blocks. ie. In a multi-block form a query can be performed only within one of the blocks at a time. A query can be performed which will return a subset of all the possible information accessable from a form, or the full set of records.
To perform a database query within a form:
There are a number of options regarding query criteria. The possibilities are:
If you expect that a large number of records may be returned, use the Count Matching Records function to determine the number prior to executing the query. If the number of records is unwieldy and greatly exceeds the number of records you are expecting, refine your query criteria and repeat the above process.
To modify data it is necessary to retrieve the data to be modified, make the required changes and save the changed records. The following instruction details this process.
To modify data using forms:
Modifying Text with the Editor
The Text Editor is a useful tool for editing fields containing lengthy data, especially where the length of the data exceeds the amount of data able to be displayed on the form. Notes fields are good examples, where several hundred words could be entered in a single field while perhaps only a dozen words might be displayed at one time.
To modify text using the Text Editor:
The Text Editor can be used on any editable field, however it is most useful for very lengthy text data.
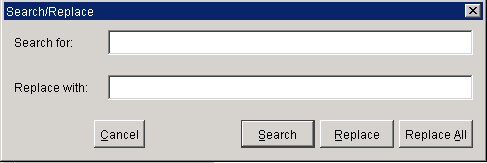
fig. 1.32 Editor form. (ovw27)
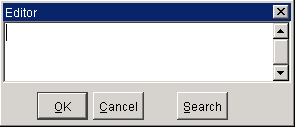
fig. 1.33 - Search/Replace form. (ovw28)
The default mode for most forms is Normal mode. (To be more descriptive we will refer to it as Insert or Update mode). This mode permits the insertion of new records. A number of different conditions may exist when you go to enter a new record and these will affect the way you go about it.
If you are unable to enter data in a form it may be for one of the following reasons:
To insert data (add a new record) using forms:
To reduce the likelihood of incorrect data being entered on the System, most data insertion and modification activities are checked by validation processes. Most validation processes are activated when you attempt to save new or altered records. An attempt to save invalid data will usually result in an error message being displayed. Validation error messages are generally self-explanatory.
If a validation error occurs, either your data must be modified to make it acceptable to the System or the attempt to save the data must be abandoned. In the latter case it will be necessary to clear the record.
Data may be deleted within a record by using the Modifying Data process. The Delete Record function is used to delete whole records. Deleting individual records is straightforward, however, deleting records which have other records dependent upon them is more involved. Throughout the manual, the method for deleting records in any particular form is described in detail.
There are two types of deletion:
The following is a general description of the deletion process.
To delete records using forms:
CAUTION should always be exercised when deleting records.
On occasions it is necessary to stop any further use of some data records. One option is to delete the records but this is not always desirable as the records may still be required for reference or may still be associated with other 'live' data. The solution is to 'close' the records. Not all data is able to be closed. The data that may be closed has a Closed check box as one of its fields. (fig. 1.34) A record may be closed by selecting the Closed check box for the record. In most cases the record can be re-opened by deselecting the Closed check box if their use is later required.
fig. 1.34 - Closed Indicator (ovw23)
Fig. 1.34 illustrates a typical use of a closed check box. The course status FUTURE has been closed. It is no longer available to be used in the definition of courses. The other course statuses are all available for use.
The Correspondence Facility supports correspondence produced in a number of Subsystems. The Correspondence Subsystem section covers the logging of correspondence and the 'automatic' creation of correspondence. Details of specific correspondence production are contained in the documentation of the relevant Subsystems.
Copying Data into Other Applications
To copy records to another application (ie. out of SIS) it is necessary to extract the records using a tool such as an ad-hoc report writer. See Reporting for further information.
Where a record is to be created which is substantially similar to an existing record, the existing record may be copied to create the new record, which may then be edited for any necessary changes.
To copy a record within a block:
The standard Print function detailed under Navigation and Standard functions produces a picture of the SIS form and its contents as displayed on screen. To print more records it is necessary to scroll the records on screen until a new subset is displayed and then Print.
Alternatively, keying ALT+Print Screen saves the currently displayed SIS form to the computer's clipboard. This screen dump may then be pasted into other applications such as MS Word documents.
Third party software capable of capturing screen images is a possible but more specialised alternative.
Every transaction on the System which adds, modifies or deletes data is recorded. A record of transactions will be maintained by the audit trail facility.
Information regarding the last change to a record may be obtained by selecting Audit Details from the Help menu in the menu bar. This will display the username of the person who made the last change and the date and time of the change. Select the OK button to dismiss the Audit Details window.
Some records have a comprehensive history of changes maintained for them. Forms for which a history of changes to records is maintained will contain a suitably named navigation button to invoke the history.
Making the first letter of data unique for that data set allows speed data entry.
For example, when planning the terms used to describe a particular status you could use this list:
Active, Planned, Inactive, Complete.
When selecting from the above list simply type the first letter and press the Tab key. Because each word starts with a different letter, the System can fill in the whole word for you.
Last Modified on 10 December, 2004