Overview
How to Access Reports and Jobs
Parameter Forms
System Parameters
Report/Job Parameters
Default Parameters
Running Reports and Jobs
Exiting a Report
Report Output
Navigating Around the Displayed Report
Printing Reports
Standard reports and jobs refers to the reports and jobs supplied with, and run from within, Callista.
Reports and jobs may be run immediately, scheduled to run as soon as possible or scheduled to run at a specified time (batch mode). Not all reports or jobs can be run in all three modes. The ability to run a report or job in a particular mode depends on its allowable modes (these are not able to be modified by users), the parameter form type of the report or job and whether or not the user is recorded in Callista as a Novice Interface user (maintained in SECF0066). The following paragraphs refer to reports and jobs that can be accessed directly rather than through Job Scheduler.
This section describes the common features of reports and jobs, how they are run in immediate mode and how they are scheduled to run as soon as possible. Information about scheduling reports and jobs to run at a specified time is contained in the Job Scheduler section.
A complete listing and description of standard reports is provided under Standard Reports Listing. A listing of jobs and their descriptions is provided under List of System Processes.
Warning
When attempting to run any job/report in immediate mode, and the result is shown in a web browser with 'pop-up' enabled, the job/report will not show. Disable 'pop-up' and try again. This applies to all pop-up programs (Google, IE XP SP2, etc).
Reports and Jobs may be accessed in the same way as forms, i.e. from the basic Callista navigation menus, via the zoom menu item from some forms or directly through the Job Scheduler. Because different people may see different menu structures, the exact location of a particular menu item may vary. Report and job menu items can be recognised by their distinctive icon.
![]() The Job/Report icon.
The Job/Report icon.
To start a report, or job, select the appropriate menu item. This will display the report/job's parameter form.
Parameter forms are the means by which the 'running' of a report is controlled. They are so called because they permit the entry of parameters (variable values) that influence the way a report is produced (system parameters) and the information that is contained in the report.
The following picture shows the common features of a typical parameter form.

1. Menu Bar and Tool Bar
Most commands can be performed either by clicking on a toolbar icon or by selecting the corresponding menu item from one of the menu bar options.
|
Icon |
Menu Item |
Function |
|
|
Action > Close |
Closes the parameter form and returns to the previous form or menu |
|
|
Action > Save |
Function is disabled in parameter forms. |
|
|
Action > Print |
Print an image of the current screen. |
|
|
Action > Run Report |
Run
the report/job immediately. |
|
|
Action > Schedule ASAP |
Schedules
the report/job to run as soon as a timeslot is available. |
|
|
Action > Schedule |
Opens
the Maintain Request Details form (JBSF5210) to enable the report/job to be manually scheduled
(commonly referred to as Batch Mode) using Job Scheduler
functionality. |
|
|
Go
> Previous Page |
Displays the next or previous parameter screen where a report or job has more than one. Alternatively, click on a parameter form tab to display the corresponding parameter screen. |
|
|
Edit > Clear Record |
Re-initiates the selected field for entry of a parameter. |
|
|
Edit > Clear Form |
Re-initiates the parameter form for entry of parameters. |
|
|
Edit Field |
Opens a separate window for editing the selected field. This may be useful for editing lengthy parameter values. |
|
|
Edit > List of Values |
Displays list of values (LOV) for field in which cursor is located. Button is disabled for fields with no LOV. |
|
|
Go > Maintain Person Preferences |
Opens the Maintain Person preferences form (SECF0066). This is useful for checking your default email and printer addresses. |
|
|
Go > Maintain Request Job Run |
Opens the Maintain request Job Run form (JBSF5300) where the progress of the report or job can be checked. |
|
|
Help > Help |
Opens the Callista User Manual in the context of the current report or job. |
2. Parameter Form Tabs
![]()
Each tab represents a set of parameters. Click on a tab to display its set. When a tab's label is followed by two asterisks (eg. Course Parameters**), this indicates that mandatory parameters are incomplete in that tab's set. When mandatory parameters are completed for a tab, the asterisks no longer display.
3. Scroll buttons
|
|
The arrows to the right of the parameter tabs can be used to scroll through the tabs.
4. Parameter Labels
|
|
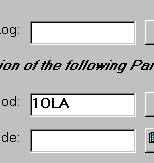
Parameter labels are the names of the fields where parameters can be entered. They are reasonably self-explanatory and relate closely to the field names used in Callista forms. Where necessary, some instruction is included in the parameter form. Eg. 'Select Either') The use of particular parameters is described in the help for the report or job. Fields with labels in red text are mandatory and must have a data value entered. When data is entered in a mandatory field, its label changes to black text. When invalid data is entered in a field, either its list of values will be invoked (if it has one) or its field label and the data value will change to red text to signify that the value must be changed. |
5. Parameter Fields
|
|
Parameter values are entered into these fields. Depending on the nature of the field, values may be keyed, selected from a list of values, returned after a lookup in the Find Person or Find Course forms or may be ticked or un-ticked, in the case of a checkbox. |
6. The Find Course button
The Find Course button ![]() invokes a
form where course codes can be looked up using search criteria. Clicking on
the OK button in the Find Course form returns you to the parameter form and
inserts the course code in the appropriate parameter field. The Find person
button
invokes a
form where course codes can be looked up using search criteria. Clicking on
the OK button in the Find Course form returns you to the parameter form and
inserts the course code in the appropriate parameter field. The Find person
button ![]() performs a similar
role in the location of particular person records.
performs a similar
role in the location of particular person records.
7. List of Values (LOV) Buttons
An LOV button displays a list of the permissible values for the adjacent parameter field. Where an LOV exists you can key a value directly in the field, select a value from the list or leave the field blank if it is not mandatory.
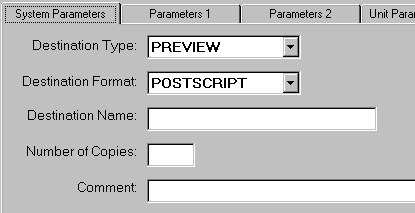
System Parameters determine how a report will be run and the nature of the output produced. The system parameters are similar on all parameter forms and are shown below.
Note that parameter forms accessed via a web browser do not have a System Parameter tab. Their system values default from those contained in the report/job definition and the Person Preferences of the user.
System Parameter Fields
|
Field Name |
Description |
|
Destination Type |
The type of device to which the report will be sent. Options are:
|
|
Destination Format |
The format that the output will be created in. Options are: · PDF - Read and print with Adobe Acrobat reader. · HTML - Read and print with most web browsers. · POSTSCRIPT - formatted for postscript printers. |
|
Destination Name |
The name to which the report output will be sent. Options are:
|
|
Number of Copies |
The number of copies to be printed. If Destination Type is not PRINTER this parameter is ignored. If the parameter is left blank it will default to 1. |
|
Runtime Comment |
Permits you to add a comment to the Header and Trailer pages of the report. |
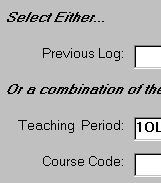
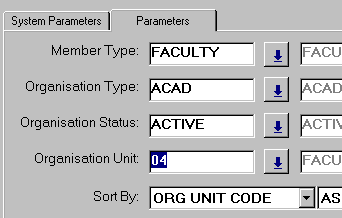
Report/Job Parameters are similar to query criteria. The user specifies data values to be used in a report's data extraction process with the result that only data matching the specified criteria is reported. A portion of a report parameter form is shown below. In this example, by specifying organisational unit 04, a report is produced containing only information related to this organisational unit.
Each report has its own set of report parameters. Parameter values are usually selected from lists of values (LOVs), invoked via LOV buttons to the right of the fields. (as shown below against the Member Type field) This ensures that only valid values are used. Some parameter forms contain parameters for other purposes. In the pictured example, the Sort By parameter is used to specify the order of presentation of data in the report.
Job parameters primarily specify the set of data to be processed by the job.
|
|
In some cases, default parameter values are displayed upon entering the parameter form, avoiding the need to enter values. The default values are normally either the most commonly used or the most likely values for the parameter. Default values can generally be overridden.
|
Running reports or jobs from the basic Callista menus |
|
To exit a running report, use the Reports Server window.
To exit a report displayed on screen in a Preview window, select the Close button from the toolbar at the top of the screen.
Standard reports are designed around a common template, promoting consistency in the layout and appearance of reports. Important parts of each report include:
Some aspects of the header and trailer pages are institution configurable, including the institution name. Content of these pages is maintained via the Maintain Report Details form (SECF0022), maintained by System Administrators.
Navigation within a report displayed on screen is achieved via navigation buttons at the top of the screen as illustrated below.
![]()
|
Navigation Button |
Use |
|
|
Prints the report to your specified printer when Preview was nominated as the destination type. The option also exists under the File menu to generate the report output to a file. |
|
Page Setup |
Allows selection of printing and printer options. |
|
|
Creates a new email message in your default email application that contains the report output as an attachment. The Destination Format should be either PDF or HTML. |
|
New Previewer |
Opens a new preview window for the same report. |
|
Close Previewer |
Closes the Preview window and exits the current report. |
|
Zoom In |
Increases the size of text for easier reading of fine detail. |
|
Zoom Out |
Reduces the size of text to enable more text to be viewed in a single screen. |
|
First |
Displays the first page of the report. (Header page) |
|
Prev |
Displays the previous page in the report. |
|
Next |
Displays the next page in the report. |
|
Last |
Displays the last page of the report. (Trailer page) |
|
Page |
Permits direct navigation to the page specified in the adjoining (editable) field. Note that this numbering refers to all pages including the Header page. The numbers printed on pages include only report Body pages. |
|
Help |
This is Oracle Reports help, not help for the displayed report. |
See 'Navigating Around the Displayed Report' above.
Last Modified on 5 October, 2004